
It’s a couple of months now the Othermill Pro is beautifully sitting on my desk and after having milled a few PCBs and showed off with my family and friends I feel dauntless enough to try something new.
I’ve got a small selection of end-mills and I didn’t want to break them all straight away with some tough material, so I opted for creating something out of plastic: a few key tags with a name on it could have done the job and milling a softer material should have be painless, right?
Sadly, I couldn’t have been wronger! As you can see from the result shown below, plastic has this unpleasant desire to melt when thermally stressed… As any other newbie I’m in a learning process.
When milling plastic you must keep the material as cool as possible, meaning you need to reduce the end-mill friction with the material as much as possible and also add any possible cooling. If the plastic starts to melt it will clog the end-mill, reducing the end-mill cutting efficiency causing an increment in friction and a consequent rise in temperature: a spiral process which results in a very bad milling and also a potentially unrecoverable end-mill.
So this is how I started learning about chip load and chip load chart tables:
 |
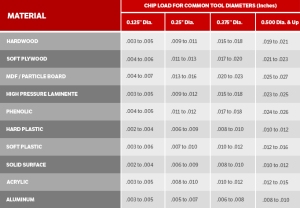 |
I’m not going to lecture you on the subject, mostly because I don’t know enough on this topic. Briefly, in order to minimize temperature rise you want to maximize the chip load thickness, reducing the rubbing effect of the end-mill on the material, which causes temperature raise without any benefit.
As clearly displayed on the diagram above, chip load thickness is determined by axial speed (rpm), radial speed or feed rate (in/m or mm/m) and number of flutes (# teeth):
CLT = feed rate ÷ rpm × teeth
Now, luckily for me, the CAM software I’ve adopted (Fusion 360) already performs those calculations and automatically adjust the parameters accordingly.
So I opted for the thickest suggested chip load on acrylic (0,13 mm) for my end-mill (a 2 flute 0,8 mm) and a very slow rotation speed (100 rpm) in order to give a little breath for the plastic to cool down: to my surprise the end-mill got clogged immediately, even worse than my previous experiments!
Apparently the just acquired knowledge is misleading, or… Should I trust my ears? Even just considering the pitch of the gentle sound emitted by my Othermill Pro I can tell the spindle is not going as slow as I planned! A quick check at the technical specs just to discover the slowest spindle speed is 8500 rpm!
That practically means the chip load was 1/85th of what I was expecting, resulting in my end-mill gently massaging the plastic surface until it turns into a smoking hot glue-ish material perfectly mating with my end-mill!
It’s time for another try, but before ruining my last end-mill (yes, the last run turned my end-mill into a glowing ball of plastic around a metal rod) I wanted to verify how accurate is the spindle speed control on my device.
Surprisingly the Othermill Pro spindle is an open loop circuit. If you are wondering what that means don’t be too ashamed, it was my very same reaction, but a little googling and you discover it means there is no feed back circuit: simply put, the machine doesn’t know how fast the spindle is actually going, it only knows at certain voltages the spindle should run at a certain speed.
Not that it is a crucial information, but given the high quality and accuracy of this CNC I was expecting some feedback, but at a second tough and considering the main aim of the Othermill Pro it does make sense why Othermachine Co. didn’t think about it.
May be I can do something about that…

Reblogged this on Zeirus's Blog.
LikeLike
Interesting, doesnt the othermill have any kind of belt adjustments for speed
LikeLike
I’m not sure what you mean…The only belts used in the othermill, for what I know, are those on the spindle drive, but I don’t see any simple way you can engineer an adjustable speed ratio using belts…
LikeLike
Got it. I just saw that this morning and thought it might function like an old style drill press, where you can move the belt to different pulleys to adjust speed. The Othermill has great product reviews everywhere I’ve seen so its surprising to hear that there is not an easy way to adjust to lower spindle speeds.
LikeLike
Reality is the machine is targeted at PCB production first, where the only important thing about spindle speed is “it should go fast”. If we speak about PCB prototyping I can confirm the Othermill is a surprisingly good product, at least an order of magnitude better than those chinese CNC machines you can find for 300€ on ebay. I’ve personally tried those and you need to spend an additional 500€ and plenty of time to get decent prototypes. With the Othermill you spend a lot more (3000$), but you get a working product capable to make PCB prototypes of an astonishing quality: when the first PCB came out of the Othermill my reaction was “AWESOME!”.
With no calibration and no hassle I just sent my gerber to the software, inserted the end-mill and stck the PCB on the bed… a few minutes later I had a 10mil trace PCB in my hands! Two weeks later I produced my first 8mil PCB and another week after a 6mil trace PCB with no hassle (just needed the right end-mills).
LikeLike