NOTE This post has been quite successful, so I decided to publish a complete series on nRF24 transceivers.
I’m working on a home automation project and I’m planning to use my Raspberry Pi as central node of a network of cheap nRF24 nodes.
First thing is to get the necessary compilation tools, something quite easy to achieve even on my RaspBMC installation:
$> apt-get install build-essential
With the compiler and the other tools at your hand you might want to get a library to get access to the nRF24 hardware, which is not a difficult step to achieve either:
$> git clone https://github.com/stanleyseow/RF24.git
$> cd RF24
$> cd librf24-rpi/librf24
// compile the files
$> make
// install the library
$> sudo make install
// check the library availability
$> sudo ldconfig -v | grep librf
      librf24.so.1 -> librf24.so.1.0
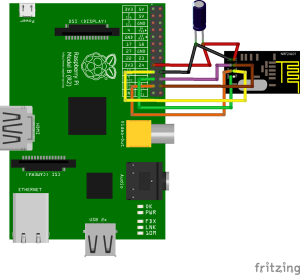
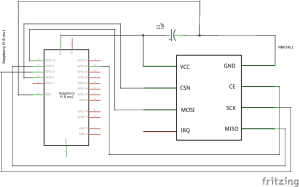
Now, let’s move to the wiring, but DO NOT attempt any connection while your Raspberry is powered up: even a brief short circuit made with a floating cable getting contact for a fraction of millisecond can ruin your day.
I’ve found some small difficulties here, mainly due to misleading information. Please refer to the pictures below and click on them to enlarge.
Once you have everything in place you can power up your Pi and starting to get some fun!
All the code below is available as a Gist on GitHub for your convenience.
You can start with the examples contained within the library itself, but if you feel brave enough here is the code I’m executing on my Pi:
// file payload.h
#ifndef __VIRIDI_NEXU_PAYLOAD__
#define __VIRIDI_NEXU_PAYLOAD__

enum PayloadType {
    HERBA, METEO
};

typedef uint8_t vn_payload_type;
typedef uint8_t vn_payload_version;

typedef struct {
        int16_t humidity;
        int16_t temperature;
        int16_t pressure;
        int16_t altitude;
        int16_t luminosity;
} vn_meteo_t;

typedef struct {
        int16_t moisture;
        int16_t temperature;
} vn_plant_t;

struct Payload {
        vn_payload_type type;
        vn_payload_version version;

        union {
            vn_meteo_t meteo;
            vn_plant_t plant;
        } data;
};

#endif // __VIRIDI_NEXU_PAYLOAD__
// file receiver.cpp
#include <cstdlib>
#include <iostream>
#include "librf24/RF24.h"
#include "payload.h"
using namespace std;
//
// Hardware configuration
//
RF24 radio("/dev/spidev0.0", 8000000 , 25); //spi device, speed and CSN,only CSN is NEEDED in RPI
const uint64_t pipes[2] = { 0xF0F0F0F0E1LL, 0xF0F0F0F0D2LL };
Payload payload = Payload();
//
// Setup
//
void setup(void) {
radio.begin();
radio.setRetries(15, 15);
radio.setDataRate(RF24_250KBPS);
radio.setPALevel(RF24_PA_MAX);
radio.setPayloadSize(sizeof(payload));
radio.openWritingPipe(pipes[1]);
radio.openReadingPipe(1, pipes[0]);
radio.startListening();
radio.printDetails();
}
//
// Loop
//
void loop(void) {
if (radio.available()) {
radio.read(&amp;amp;amp;amp;payload, sizeof(payload));
printf("packet %d %d %d %d %d \n", payload.data.meteo.temperature, payload.data.meteo.humidity, payload.data.meteo.luminosity, payload.data.meteo.altitude, payload.data.meteo.pressure);
}
}
int main(int argc, char** argv){
setup();
while(1)
loop();
return 0;
}
To build the above code you just save the two files and execute gcc providing the necessary parameters: if you get an error regarding a missing header file you might have to adjust the librf/RF24.h include directive accordingly to your build location.
$> g++ -Wall -Ofast -mfpu=vfp -mfloat-abi=hard -march=armv6zk -mtune=arm1176jzf-s -L../librf24/ -lrf24 receiver.cpp -o receiver
Remeber you must be have access to the /dev/spidev device to execute your program, the simplest way to get such permission is by running your receiver code as root:
$> sudo ./receiver
Now let me give you one last advice: always take in consideration differences in hardware architecture when you program/compile your communcation software!
In particular, if you send something from an Arduino (8 bit microcontroller) take in consideration there’s an important difference when the same data is read from the Raspberry (32 bit ARM processor):
- float numbers are 4 bytes long on Arduino and 8 bytes on Raspberry
- enumeration are 2 bytes on Arduino and 4 bytes on Raspberry
- any struct on Raspberry is padded to even bytes
- and so forth
What this means while developing for the nRF24 chips is that you need to take in consideration the architecture differences when transferring data and ensure the data types can be handled by both ends of the communication channel: my suggestion is to avoid floating points and stick to integers. If you need to transfer fractional values, switch the number to a higher scale: for example instead of transferring a temperature sensor reading of 25.12 C° (Centigrade degrees), multiply the value by 1000 and transfer it as 25120 mC° (milli Centigrade degrees).
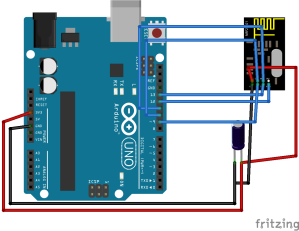
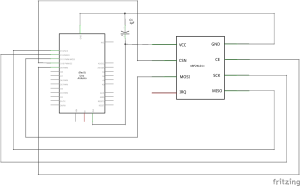
On the Arduino side there are many tutorials out there, but for the sake of completeness here is my wiring and the simple software sending out the payload for the Raspberry to read.
And here is the Arduino sketch broadcasting the data into the air
#include "payload.h"

#define SERIAL_DEBUG true
#include <SerialDebug.h>

#define LED_DEBUG true
#include <LedDebug.h>

#define SENSE_DELAY 2000
Payload payload = (Payload) { METEO };

#include <RF24Network.h>
#include <RF24.h>
#include <SPI.h>

uint32_t lastSense;
inline bool sense() {
	long now = millis();
	if (now < lastSense || now - lastSense > SENSE_DELAY) {
		payload.data.meteo.humidity = millis();
		payload.data.meteo.temperature = millis() * 50;
		payload.data.meteo.pressure = millis();
		payload.data.meteo.altitude = millis();
		payload.data.meteo.luminosity = map(analogRead(A0), 0, 1024, 100, 0);
		lastSense = now;
		return true;
	} else {
		return false;
	}
}

#define RADIO_CE_PIN 9
#define RADIO_CS_PIN 10
#define RADIO_RETRY_DELAY 15
#define RADIO_RETRY_COUNT 15
RF24 radio = RF24(RADIO_CE_PIN, RADIO_CS_PIN);
const uint64_t pipes[2] = { 0xF0F0F0F0E1LL, 0xF0F0F0F0D2LL };

void setup() {
	SERIAL_DEBUG_SETUP(9600);
	pinMode(A0, INPUT);

	radio.begin();
	radio.setRetries(RADIO_RETRY_DELAY, RADIO_RETRY_COUNT);
	radio.setDataRate(RF24_250KBPS);
	radio.setPALevel(RF24_PA_MAX);
	radio.setPayloadSize(sizeof(payload));
	radio.openWritingPipe(pipes[0]);
	radio.openReadingPipe(1,pipes[1]);
}

void loop() {
	if (sense()) {
		radio.powerUp();
		if (!radio.write(&payload, sizeof(payload))) {
			PULSE(3,75);
		} else {
			PULSE(1,225);
		}
		radio.powerDown();

		DEBUG("payload", sizeof(payload), "enum", sizeof(payload.type));
	}
}


what is the indoor range of these RF components?
LikeLike
It depends on many factors, but to put it the easy way you can expect no more than 30′ in a concrete house with the cheapest version of these boards, the one with the zigzag antenna.
I can be more specific if you wish and provide some field test results and a list of factors that might influence the range.
LikeLike
Is anyone else getting the following error?
pi@raspberrypi ~/RF24/examples $ sudo ./scanner/
sudo: ./scanner/: command not found
LikeLike
Try removing the slash at the end…
LikeLike
Are you sure about the command? +1 for the final slash
You need activate SPI on the RPi, type the command “gpio load spi” (remove the 2 “) and check if the SPI interface is loaded with lsmod 😉
LikeLike
many thanks for your prompt reply, I got it working just before i saw your reply. removing the slash does make it work but i also do some other things, i ran make and sudo make install in the examples folder, not sure if this helped anything or not.
LikeLike
Nice post!
But some of the code is missing:
// file receiver.cpp
#include
#include
#include “librf24/RF24.h”
#include “payload.h”
Maybee posting the code and fritzing files to a github.com is a ideea?
LikeLike
Hi Mats, thanks a million for highlighting the issue, I messed up the post with those angular brackets… It should be fixed now.
About the GitHub suggestion I did partially implement it: I’ve published a Gist with the code, I don’t think those few files deserve a repo of their own.
LikeLike
I have repo’s just containing just two files.
And inspired by your work I have started to create a adapter PCB in Eagle CAD.
url to github is coming soon.
LikeLike
https://github.com/MatsK/nRF24-Arduino-adapter
The Arduino UNO – nRF24L01 adapter is ready, and now in the etching bath.
LikeLike
Thanks for this article. I am trying to do the same using a RasPi as the RF24 network hub (receiver). I had a quick look into the RF24 RasPi driver source code(librf24-bcm). The implementation of available and read functions appear to be ok in terms of performance. However it appears from the API that you have to poll on available(), start & stopListening() functions. This can be a problem if I’m trying to do some other computing tasks in the background on the RPI.
Is anyone aware of a notification based driver for RF24 on the RPI? In other words a blocking call which will put the thread to wait rather than poll till it becomes available? I am new to Raspberry Pi, so I’m not sure if there is any hardware limitation to prevent writing this functionality myself for example.
Thanks.
-Rohit
LikeLike
executed the command “git clone https://gitbub.com/stanleyseow/RF24.git”
RF24 directory is cloned. on (18th august 2014)
but RF24 directory doesnot have “librf24” subdirectory and “make” files
kindly advise me
LikeLike
make files are available in
RF24/RPi/RF24/
Kindly correct the installation instruction accordingly
LikeLike
Hello, the whole thing is going sound here and ofcourse every
one is sharing data, that’s truly fine, keep up writing.
LikeLike
Hi, just stumbled acoss your log.
I want to send (Below) from the arduino to my RPi.
So far i can send the arduino data but i am unable to get the to decode the data.
Can anyeone help?
typedef struct{
uint8_t NodeID = ‘Test’;
int IrProx;
int Gas;
int LDR;
double Front_Range;
int Proximity[4];
char formatTime[9]; // 00:00:00 + /0
}
DataRX;
DataRX Telemetry;
Thanks.
Ddea
LikeLike
First of all, this is a blog, not a forum, which means don’t expect anybody else to respond other than me.
From your payload, I would suggest to verify the size of the packet and the struct: as I said in my article the architecture differences are not always obvious. As an example you might get better results by using int everywhere and ensuring you pad your data to 32 bits…
Definitely using double data type is not going to help as the two architectures have different interpretation of floating points: just avoid them for peace of mind and stick to integers.
LikeLike
Would you happen to know the wiring connections for the B+? I’m also working on home automation…
LikeLike
That’s easy, the B+ is somehow backward compatible with the A and B models, meaning they have the same pinout, the B+ adds some additional pins all at the bottom of the connector: this means the connections are the same as depicted in the post pictures.

The following image might clear this up to you as the real difference is between model B rev.1 and model B rev.2+ where one of the GPIO have been changed:
As you can see the upper section of the B rev.2+ and the B+ models are identical, which means you can wire it the same way, just ensure you count your pins from the top and you will be fine.
LikeLike
Hi
Do you have any pointer, to make the NRF24 work on c#..
Thanks
LikeLike
Sorry, never wrote a single line of C# in my 20 years of software development career… And I don’t plan to ever do 😀
LikeLike
This is a blog, it is not meant to replace StackOverflow… I suggest you post your question over there
LikeLike
Getting this error when trying to compile it. Any hint what causes this issue?
pi@raspberrypi ~/RF24/RPi/RF24 $ make
g++ -Wall -fPIC -Ofast -mfpu=vfp -mfloat-abi=hard -march=armv6zk -mtune=arm1176jzf-s -c RF24.cpp
as: error while loading shared libraries: hibz.so.1: cannot open shared object file: No such file or directory
Makefile:40: recipe for target ‘RF24.o’ failed
make: *** [RF24.o] Error 1
LikeLike
All I can say is it seems library hibz is missing
LikeLike
Thanks. This far I understood it also, but have no clue why it is needed, what it is etc. No hits when googling for this library.
LikeLike